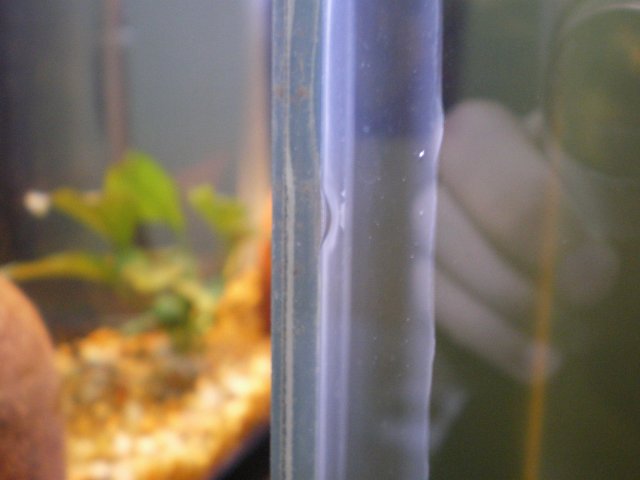
bubbles in silicone

Lyncho

AC Members
Sep 9, 2009
7
0
0
44
Brewcity, WI
I recently tried to re-seal my tank last night and this morning I noticed that there are two air bubbles in the fresh silicone I applied. They both are about 1/4 of the way down on opposite corners. One is a little bit smaller then a BB (copper bullets for an air gun) and the other is about 3/8" long and thickness of a toothpick. The second one is more like an air pocket then a round bubble. I think the problem was I taped the corners to big and my silicone push tool (plastic spoon) was to big for the corner. I accidently threw my old credit cards away, and wasn't even thinking about using them as a tool.

Is it necessary to redo the silicone? If I leave it, I'm probably just flirting with disaster... correct? It's a 55 gallon, so it would be a pretty big mess :duh: :1zhelp:Just wondering what the general consensus is with you guys/gals. TIA
 
I myself would re do that silicone in the area, You dont have to reseal the whole tank. With the pressure that will be pressed against the glass when the tank is full, you dont want the silicone coming apart, or water getting in those air pockets.
 
But from what I have read on multiple web pages say that you can't put fresh silicone onto cured silicone, because it will not adhere to the already cured silicone?
 
I myself would re do that silicone in the area, You dont have to reseal the whole tank. With the pressure that will be pressed against the glass when the tank is full, you dont want the silicone coming apart, or water getting in those air pockets.
That sort of repair won't work, new silicone will not bond to old and water will find it's way through.
I would fill the tank up outside and leave it a week, if it doesn't leak you should be good to use it. If it was mine i would probably redo it for peace of mind.
 
That sort of repair won't work, new silicone will not bond to old and water will find it's way through.
I would fill the tank up outside and leave it a week, if it doesn't leak you should be good to use it. If it was mine i would probably redo it for peace of mind.

Thats what bothers me the most.....peace of mind. Ogh yeagh... and 55 gallons of water and dead fish on my living room floor. Already had a toilet tank crack, and came home to 1" of water in bathroom trickling sown the stairs.:swear:

What really grinds my gears is how the bubble is even there. I used 2 10 oz. tubes of GE window & door #1, had plenty being squeezed out at the top by the frame. So it wasn't like I didn't apply enough. I guess this is one of those learning experiences... live and learn. Getting some good practice in though...:clap:

You think the bubble came from a "leak" on the outside of the tank? What I mean is the silicone pulled away from the corner, and while this happened.. it pulled air from outside the tank? Kinda a backwards leak, but with air...
 
Hi Lyncho,
I was scrolling through some of the older posts and came across your posting about resealing of your 55gal tank. When you mentioned the GE Window and Door silicone I questioned whether or not the silicone contained mold and mildew additives. If so remove all of it immeadiately and start over. The mold and mildew chemicals will leach out into the water and that's not good at all! You'll need to purchase 100% silicone that is food safe with no mold or mildew additives. I used GE Silicone 1 (Window/Door//Attic/Basement) that I purchased from my local Lowes store.

OK so much for that. Your main post asked about bubbles in the fresh silicone. This may have been caused by either some left over old silicone after scraping or the glass surface not cleaned properly. You must wipe the area to reseal with alcohol or lacquer thinner and then give it a good cleaning with water and vinegar to remove any alcohol or lacquer thinner residue. As other's have mentioned new silicone will not adhere to old silicone.
Next is best way I came up with to properly and securely reseal the any joints and create a smooth radius. For the most part some of the techniques have been borrowed from others who have successfully resealed their tanks.
1- Make sure all old silicone has been removed and area prepped and cleaned.

2- Find or create a spacer 3/8" wide x 8" long. I used a piece of high quality plywood and made sure all edges were clean and sharp and that the piece was flat.

3- The spacer is used to create a straight line for you to follow when applying the tape. Use Painter's masking tape 3/4" wide. At one end of the tape strip fold it over about 1/4" giving a tab to grab a hold of when removing.

4- Place spacer against the glass and start the tape tight up against the end of the spacer. As you apply the tape, about 6 inches worth, move the spacer forward and continue applying tape until you have reached the top end of the glass. If you end up with a slight glob of silicone at the end don't worry about it. It will never be seen.

5- Creating the radius is quite simple. Because we spaced our tape 3/8" from the glass we'll need a tool to make a smooth joint. Consider the 3/8" spacer as a radius. That means we need a tool with a 3/4" diameter. Go to your local hobby store and purchase a round wooden ball with a 3/4" diameter. Insert a long screw into the ball to be used as a handle. Why use a ball? First, it provides the radius and also allows you to move your hand in any position you need to comfortly continue the smooth radius of the joint. Because the ball is completely round the radius never changes. Wipe the ball clean before starting the joint.

6- After you have completed the joint give the silicone just a minute or so then start to remove the tape. Start at the end you folded over and pull the tape towards you. Don't pull straight up, slightly angle it about 45 degrees. If done correctly there should no reason why you'd have to go back and fix a bad area- of which you don't want to no matter what! If something does go south don't try to fix it. You'll have to wait until the silicone has dried and start over.

7- Leave the silicone cure for 48 hours then go ahead and fill tank one third, one third, one third. Watch between each filling that no leaks are present.

Hope this helps you and anyone else that needed info on sealing their tank.
Scott
 
The first time I re-sealed a tank I had a tiny air bubble. I left mine as it was, but the tank was only 20g. Although leaving it probably isn't the best thing to do, I left it anyway. The tank has been set up since April, and I have had no problems. But you have a 55g tank, I'd recommend re-sealing it again. The 55g would put out more preasure than a 20g.

I think sometimes air bubbles can just happen. I made sure my tank was completely clean, and I used my finger to smooth out the sealant.

IMGP4641.JPG
 
AquariaCentral.com